
Welcome to Your Interactive Support Guide 🤓
This guide is split into 8 steps to help you learn all of the Community Manager tools easily! We recommend familiarizing yourself with your brand dashboard with this guide next to you. This is fully responsive, so feel free to use your phone or tablet as an extra screen.USEFUL NAVIGATIONS: 📱
- The "i" icon on the menu bar takes you directly to all the steps. Feel free to skip steps and find everything you need there!
- The home icon on the menu bar takes you back to your support page.
- If you are following this guide step by step, you can use the left, up, and right arrows to help you easily navigate through.

How to Login to Your Community Brand Dashboard 🔑
1. Login to your own dashboard by going to admin.wearelocals.co.uk with your username & password.Remember to check your junk/spam inbox for our password request email to create a new password for your account before attempting to login to your brand. If you have not received this, please let us know and we will send another email to you.
Understanding Your Dashboard Controls 🤓
Once you have logged in, you will be taken to this screen which is your community manager dashboard. This section gives a brief overview of your dashboard controls, there will be more information on each individual control in the following sections.
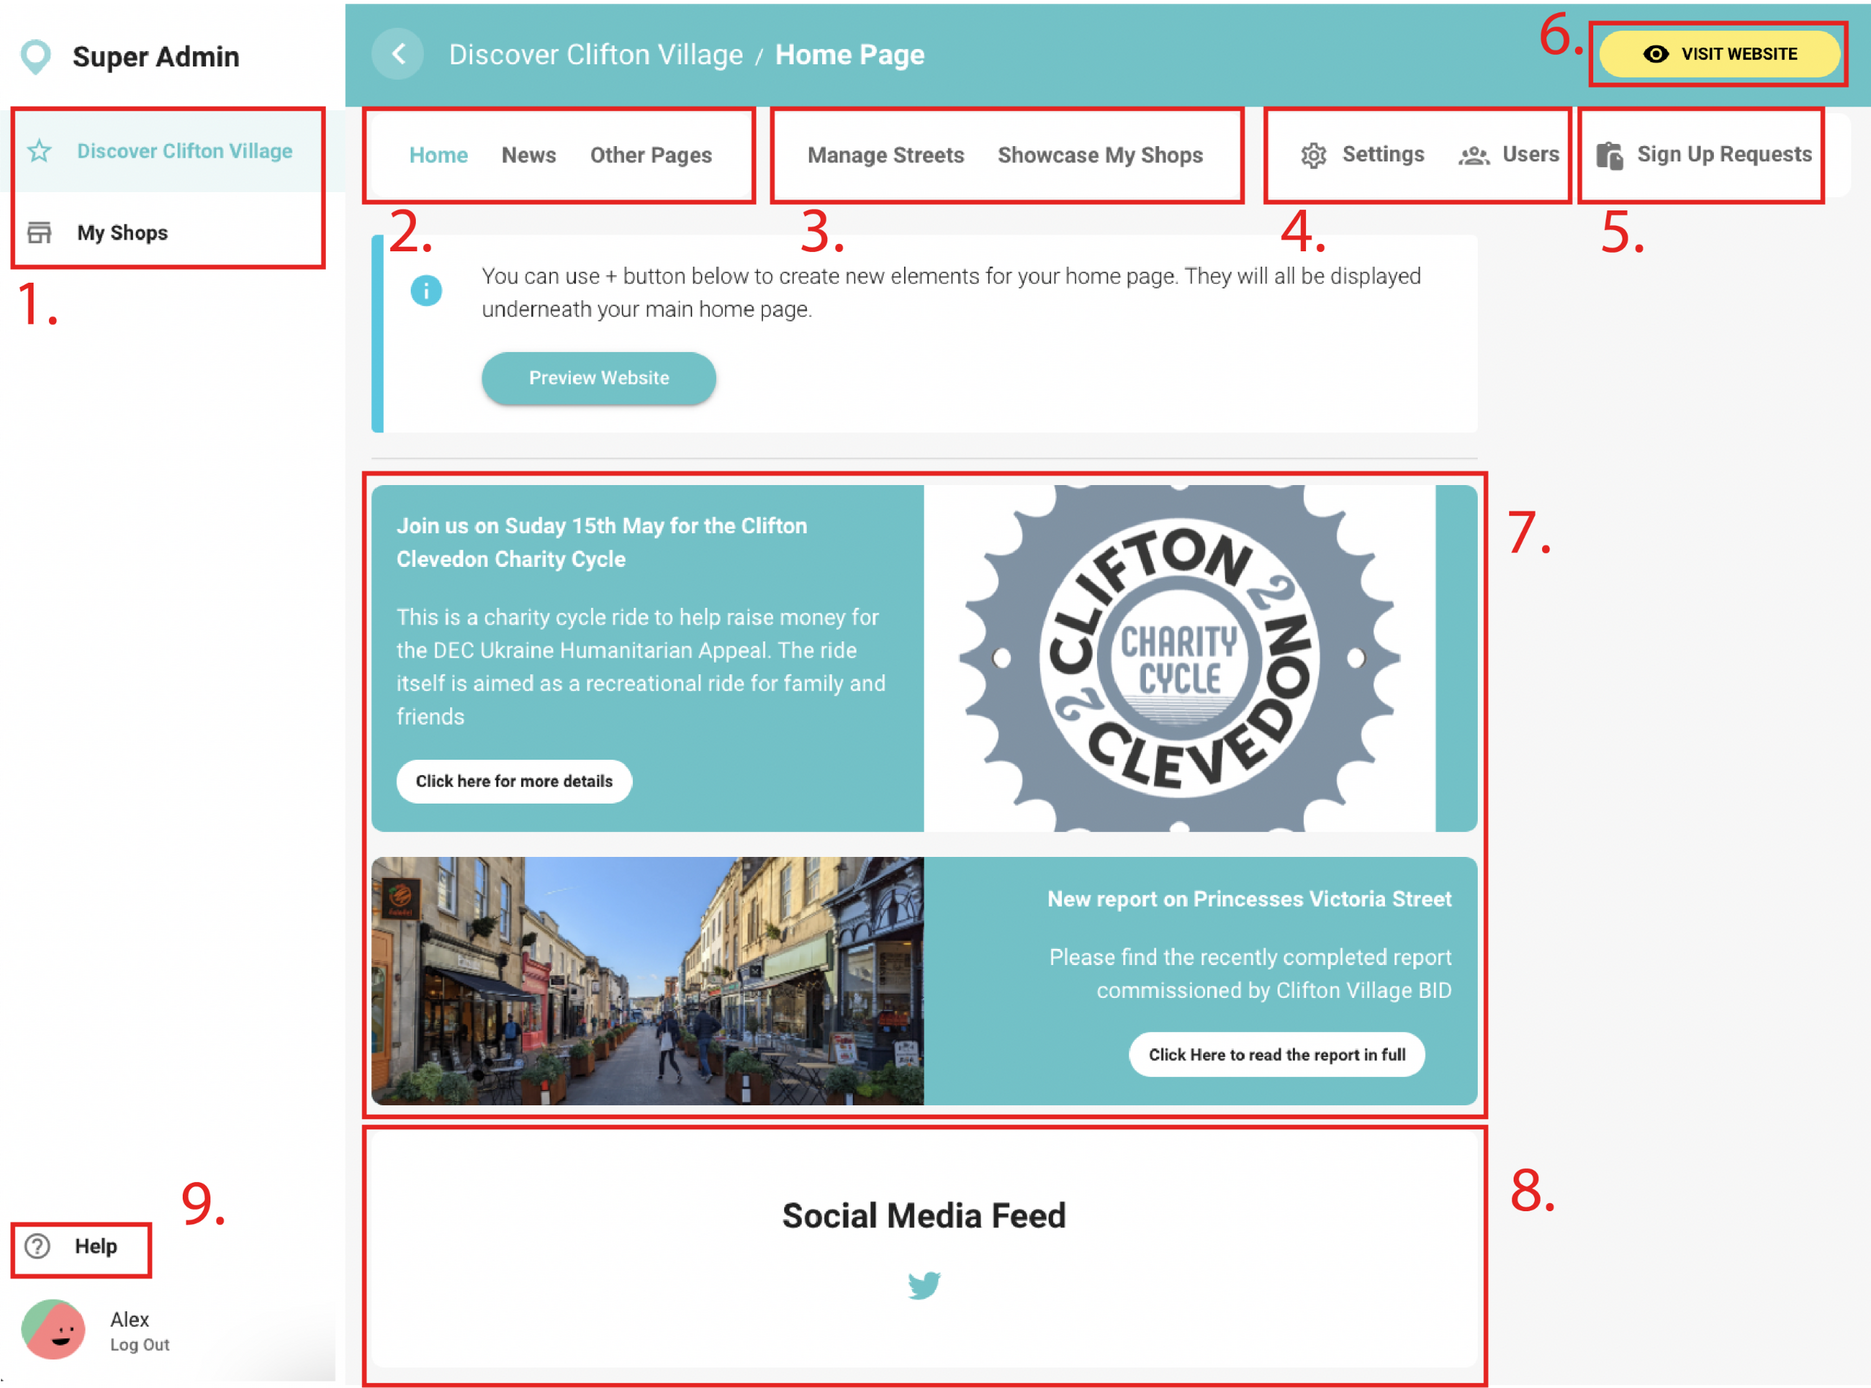
1. My Brand and My Shops These two tabs on the top left will let you see your brand or the shops that have been added onto your brand. You can also click on 'My Shops' to 'Register A New Shop' if you need to. You can find out more about setting up retail shops HERE!
2. Home, News and Other Pages These dashboard controls on the top left of the screen represent the different pages on your website. You can click on each of these to edit each page individually and you can use the 'Other Pages' tab to add and edit up to 5 extra pages.
3. Manage Zones and Showcase My Shops These tabs in the top middle of the page can be used to manage the shops within your brand. The 'Manage Streets' will let you create specific zones for your shops to be filtered by. You can also choose from labels like area, street, town, village, location, district and zone within your settings. The 'Showcase My Shops' tabs, enables you to showcase a specific shop on the homepage if you wanted. A shop may have a sale or the shop is hosting a holiday event for example.
4. Settings and Users The top right tabs on your dashboard can be used to adjust the Settings and managing the Users on your brand.
5. Sign Up Requests This is where you can accept or reject any new sign up requests from businesses.
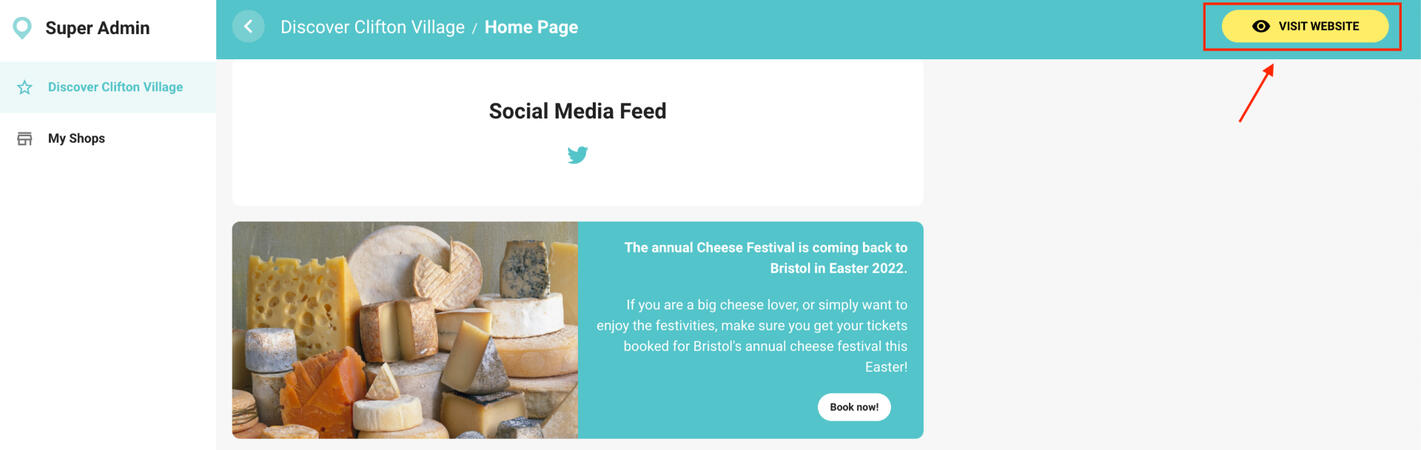
6. Visit Website You can use the 'Visit Website' button at any time to access your live website.
7. Homepage Elements This is what a homepage element looks like, if you scroll down to the bottom of this page you will be able to click on 'Add New Homepage Element'.
8. Social Media Feed This is where your social media feed can be integrated into your website, which can be created in settings.
9. Help If you are ever struggling with understanding your community brand dashboard, you can click this 'Help' icon and you will be brought to the support library.

Adding Homepage Elements ✍️
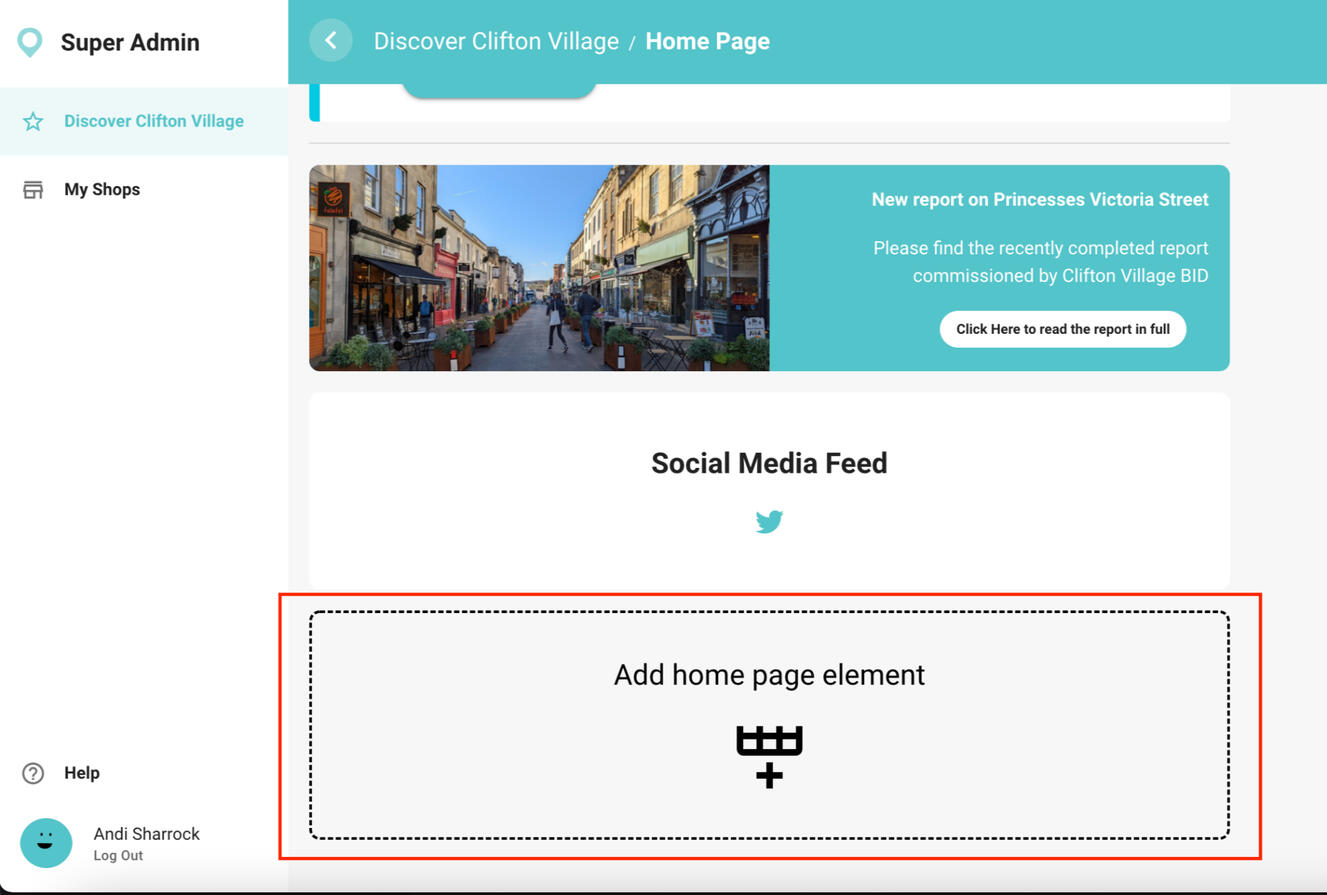
Login to your Brand Dashboard and then select the page called Home. Once you have accessed your homepage, use the following instructions to add homepage elements.
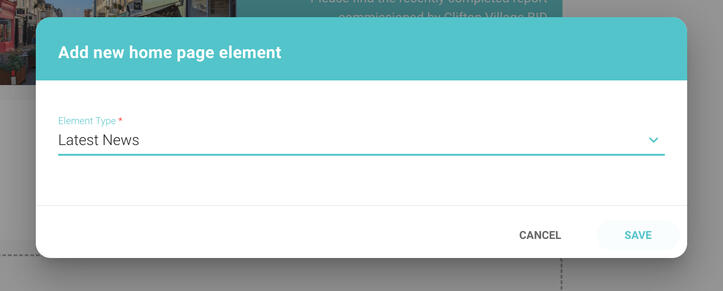
1. Click on the Add New Homepage Element button. When you are on your homepage, select 'Add Homepage Element' in order to begin creating a new homepage element. If you have a few homepage elements already you may need to scroll down to find this.
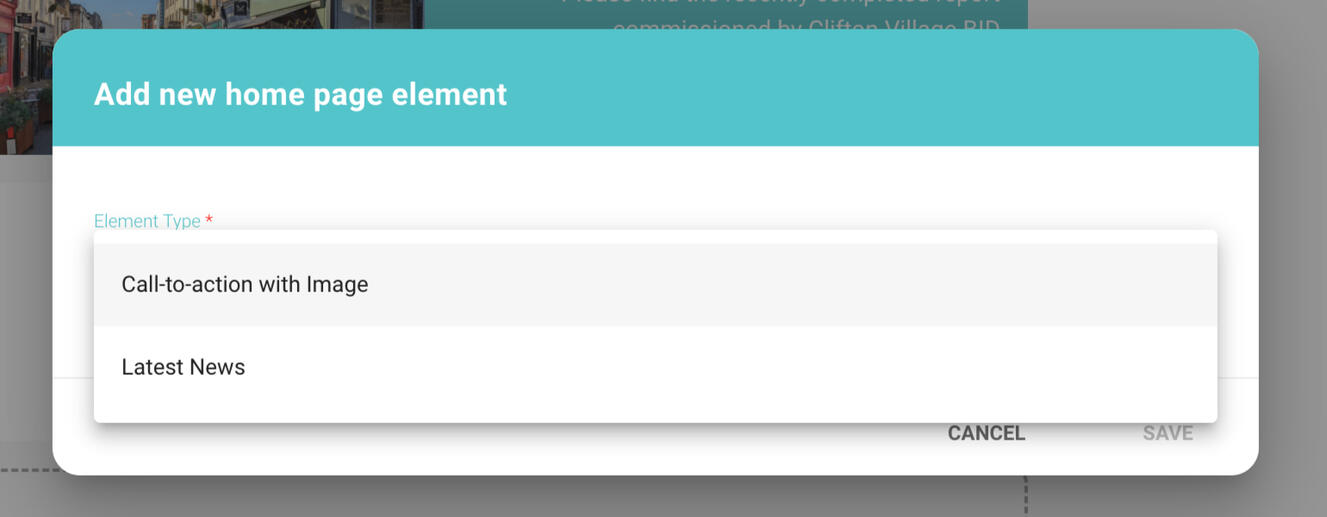
2. Select whether you want your new homepage element to be either a Call To Action With Image or Latest News.A Call To Action With Image, means you will be able to create a new homepage element with a button that links to an exterior website. For example, you may use a call to action element with an image to redirect customers for an event to a specific website that sells tickets.Latest News means that you will be using the homepage to advertise a post that has already been created on your news page. You will need to have already posted a news item under your news page in order to do this.

Adding A Call To Action Homepage Element ✍️
Go to Home > Add Homepage Element > Call To Action With Image - Let your customers know about the latest events & where to get more information with external website links.
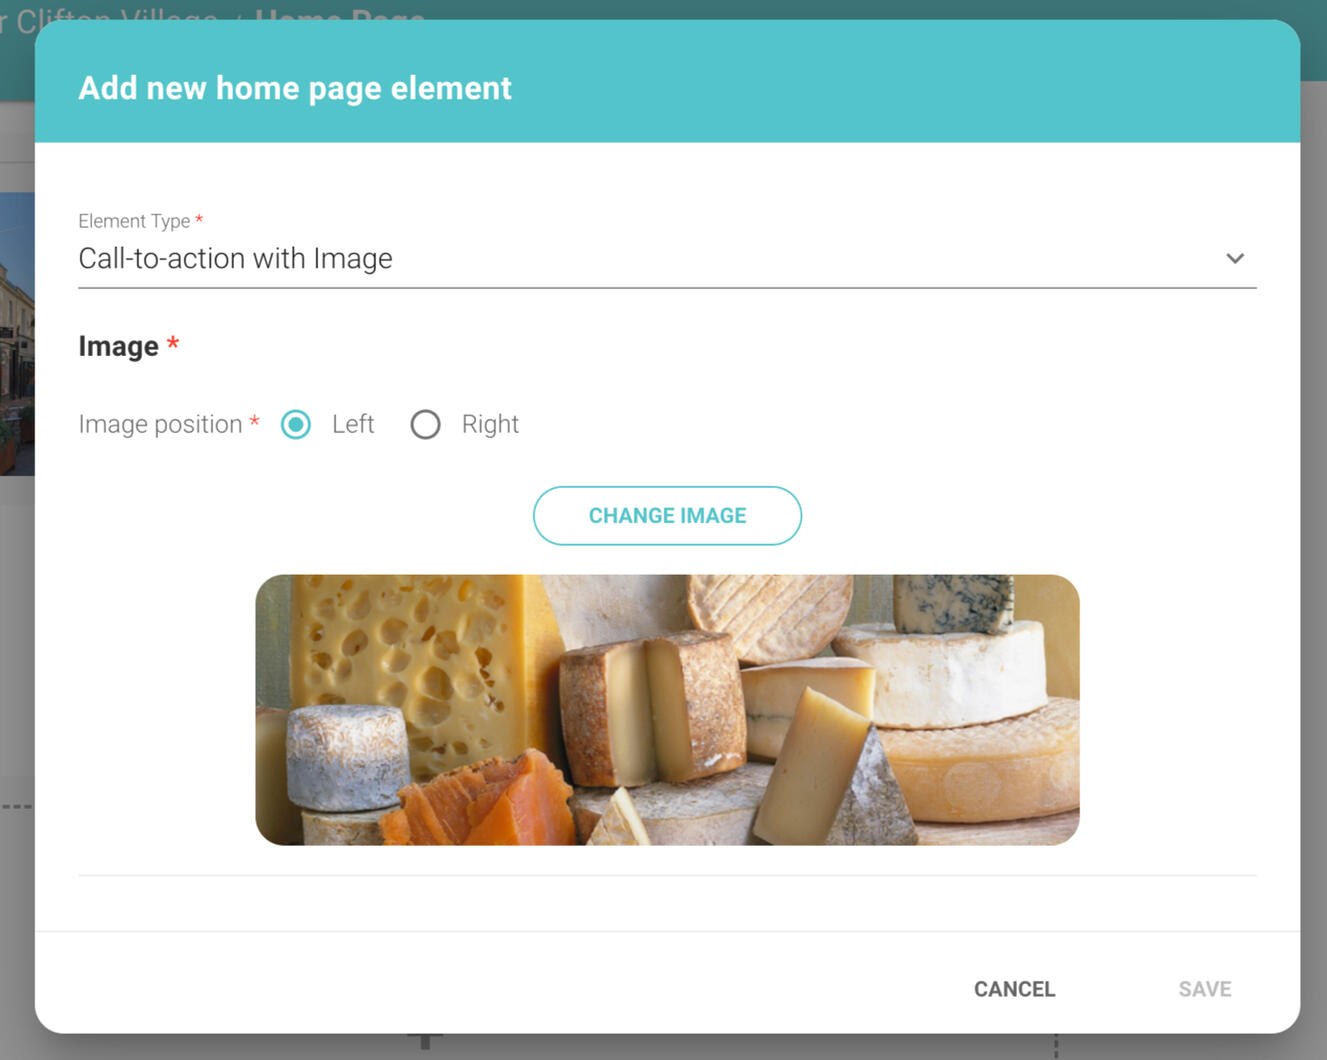
1. Select Call-to-action with Image Once you have selected this, this pop up will appear for you to fill out the information.2. Image Here you can upload an image that is related to your call to action and also choose what side your image will appear on.
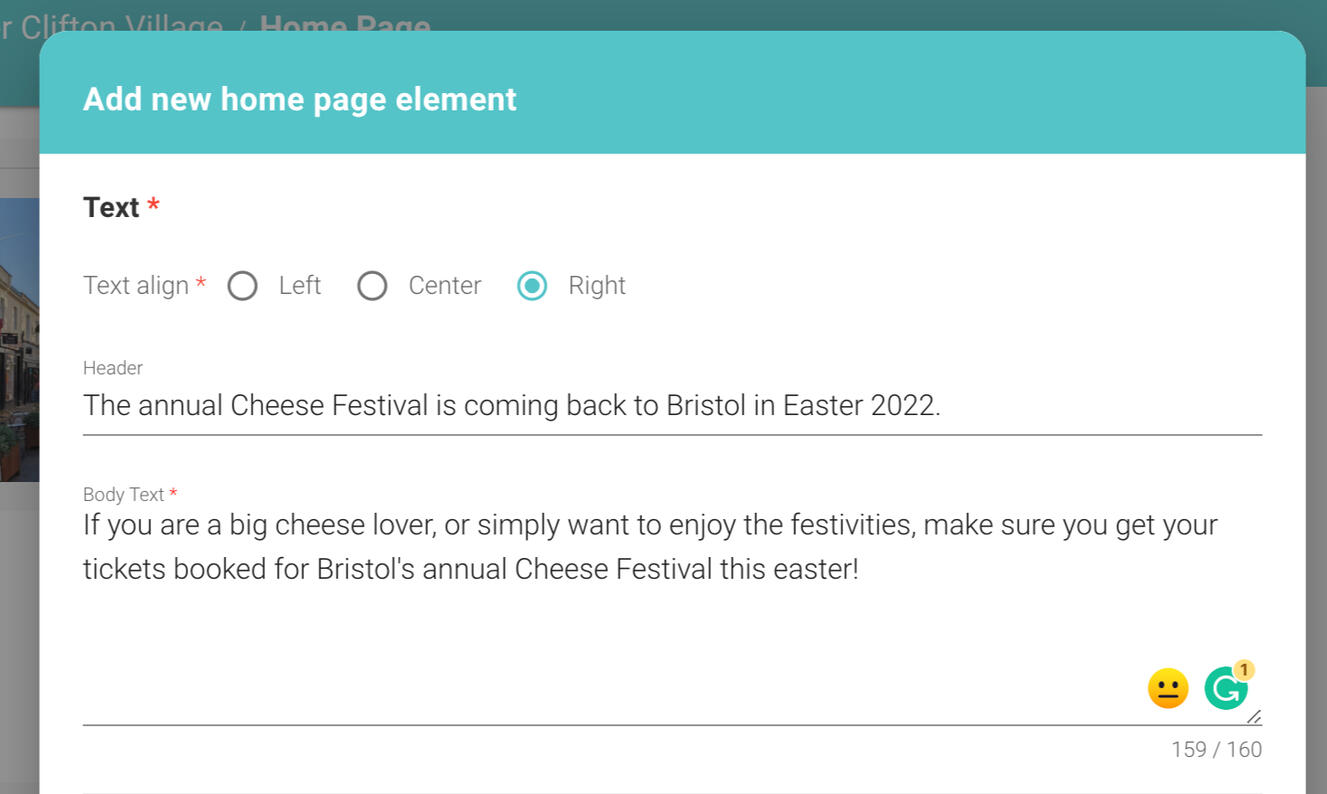
3. Text If you scroll down, you will be able to get to the text section. Here you can add your call to action title under the header, type your content into the body text section and position where your body text will appear using the text align tool.
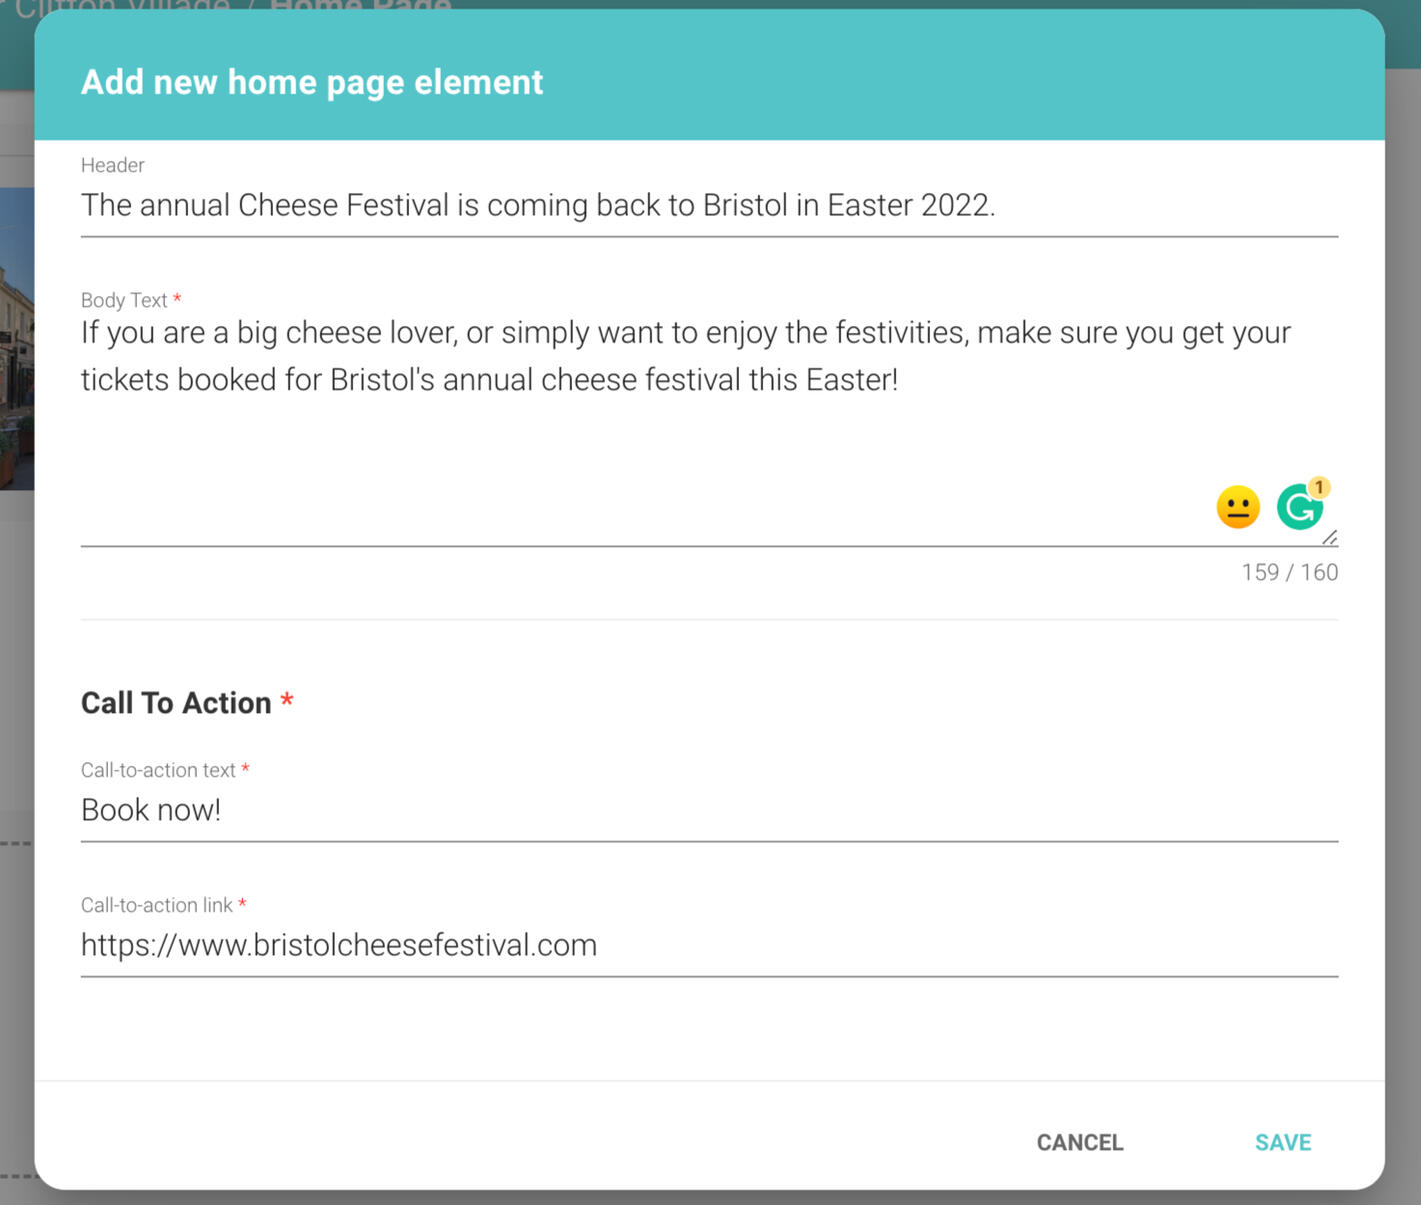
4. Call to action Scroll down even further and you will find the Call To Action section. The Call To Action Text is essentially going to be a button that enables a hyperlink, so fill it in with text like "Book now!", "Shop now!" or whatever may be relevant to your post. In this instance, I want the readers to book tickets to the cheese festival so I have put "Book now!"Now, you can put the website address that you wish to send visitors to within Call To Action Link. This is where they will be taken to when they click on your Call To Action Text.Finally, click save and your Call To Action Homepage Element is finished!
5. Preview Now you should be able to see your newly created Call To Action Homepage Element on your home section on the dashboard. Make sure to double-check how your homepage element looks on the live website by using the yellow Visit Website button in the top right of the admin dashboard.
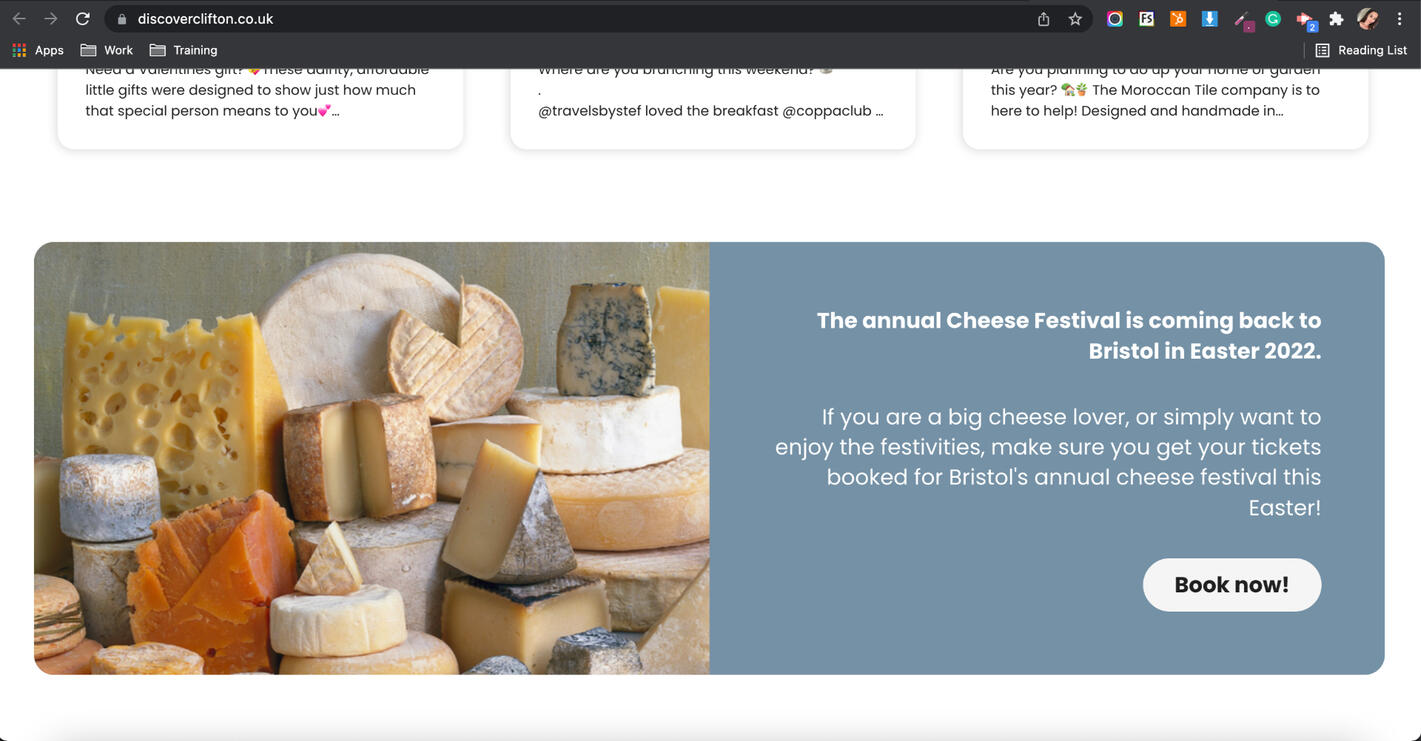
This is how your Call To Action Homepage Element should look on your live homepage.

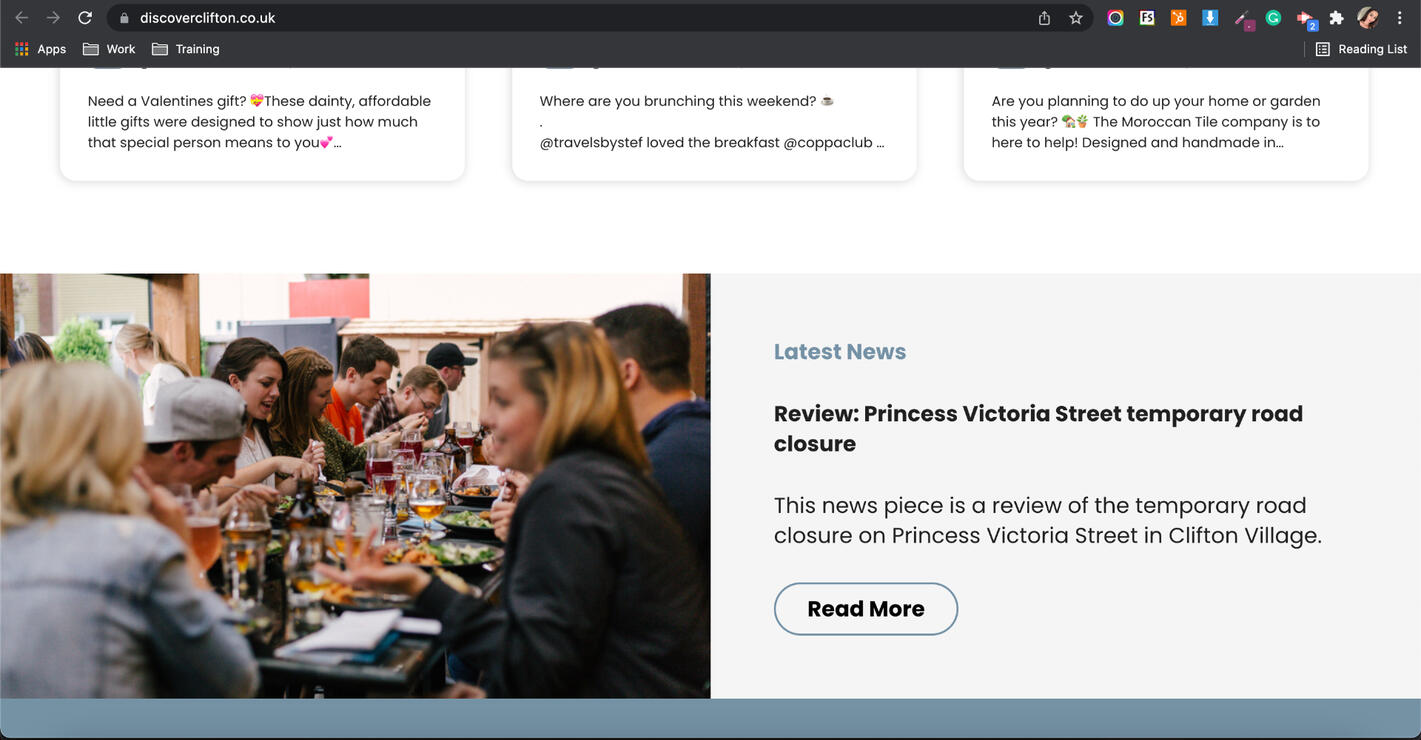
Adding A Latest News Homepage Element ✍️
Go to Home > Add Homepage Element > Call To Action With Image - Let your customers know about the latest news posts by giving them a preview of your news page.
1. Select Latest News Post Once you have clicked on Add Homepage Element, select Latest News and then save.
2. Preview Now you will be able to see a preview of the most recent post on your news page being featured on your homepage. Make sure to preview how this looks on your live website by clicking the Visit Website button in the top right corner.
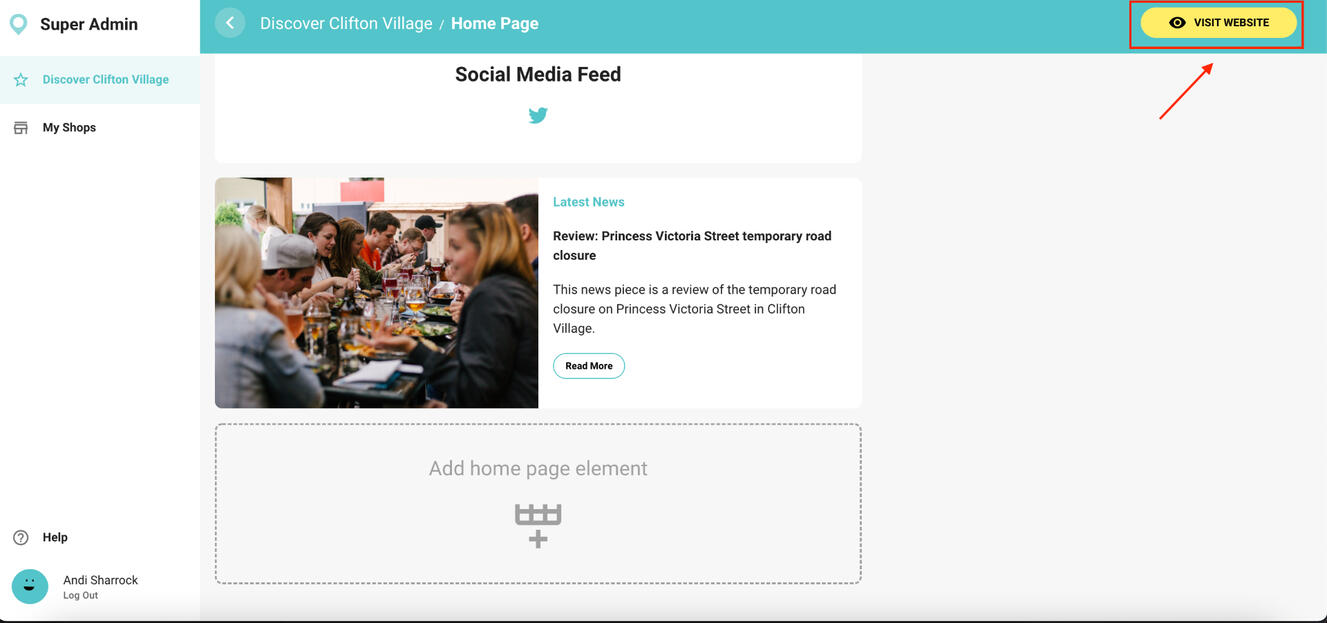
This is how your Latest News Homepage Element should look on your live homepage.

Understanding Your News Page 📣
Go to My Brand Dashboard > News Once you have logged in, make sure to click the news tab on the top middle of the screen to be taken to your news page. From here, you will be able to use a range of controls to create, edit and delete news posts. The following section explains each control in more detail.
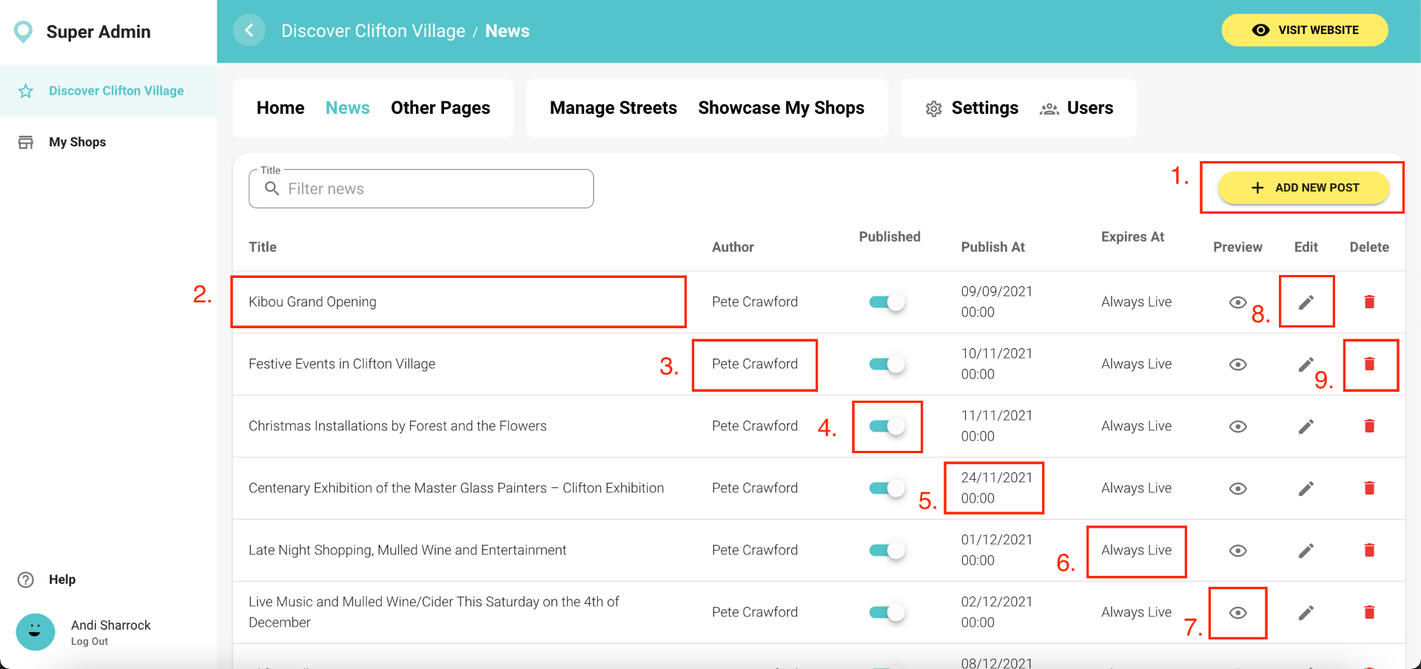
1 Add New Post. To edit an existing news post, simply click on this yellow Add New Post button.
2 Title. You can use the Title column to see the names of previously made news posts here.
3. Author You can use the Author column to view who has written which news post.
4. Published This Published toggle indicates whether a post has been published or not. When you create a new post, it will always remain unpublished so that you can preview it first before going live. This means you can easily write your news posts in advance and publish them at a later date if you wished to do so.
5. Published At Use the Published At column to find out when a news post was published.
6. Expires At The Expires At column is to show you when a post is due to expire. You are able to set a post to expire at a specific time in the requirements when you create a new post.
7. Preview You can use the Preview to preview what a post looks like at any time. We advise you to preview your new unpublished posts to double-check you are happy with them before going live on the Published toggle.
8. Edit Click on the Edit symbol to edit any previously made posts.
9. Delete Use the Delete button (red bin) to delete any posts you do not wish to have on the website. When creating a new post, you do have the option to create an expiry date for posts to save you delete them in the future.
